

If you have a formula that you would like to copy to an entire column in Excel, there is a very easy and fast way of doing this, by using “autofill” which is referred to as “fill down” when being used to apply formulas to a column.
You can also copy/fill formulas horizontally through a row, by using “fill right”.
To copy a formula down an entire column in Excel, follow the steps below:
- Enter a formula into the cell that is at the top of the column/range that you want to copy your formulas into
- Select the cell that has the formula in it, then click on the fill handle, and then hold the click (The fill handle looks like a cross / plus sign, and it will appear when hovering your cursor over the tiny blue square at the bottom right corner of a cell selection)
- Drag the fill handle down to the bottom of the column/range that you want your formulas to copy into
- Release your click when you have reached the last cell that you want the formula copied into
- Alternative method: You can also copy and paste cells that have formulas in them to copy formulas. Click on a cell with a formula in it, press Ctrl + C on the keyboard to copy it, then select another cell, and press Ctrl + V on the keyboard to paste the formula
This article shows how to copy formulas in Excel, but click here if you want to learn how to copy formulas in Google Sheets.
When you hover your mouse over the small green square that displays at the bottom right corner of a cell selection, your cursor will turn into a plus sign (cross), and this is what is called the “fill handle”.
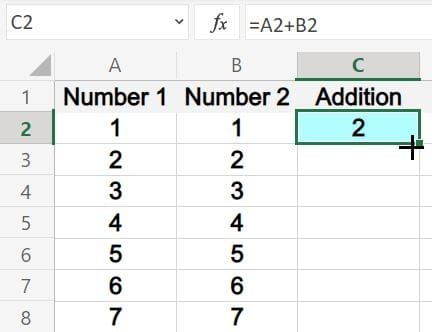
This picture is an example of what it will look like when your cursor is in the correct location to use autofill / fill down.
At the bottom right of cell C2 (blue cell), you can see that the cursor looks like a plus sign.
Later in this article you will be able to see a full example of copying/filling the formula that is shown in cell C2 down the column into the cells below it.
Automatic cell reference adjustment when copying formulas
When using autofill with formulas, Excel will automatically adjust the cell references in the formulas to account for the formulas being placed inside a different column/row.
As a quick example of this reference adjustment that happens when copying formulas, which I will go over in detail later… notice the formula that is entered into cell C2 in the picture above: =A2+B2
When this formula is copied into the cell below it, the copied formula will have adjusted its row references, and will now be: =A3+B3
Or if this formula were copied into the cell to the right of it, the copied formula would have adjusted its column references, and would then be: =C2+D2
There is a way to prevent these references from changing if you want, but we will save that for later.
Filling formulas vs. Filling a series with autofill
There are a variety of ways to use autofill in Excel, but in this article we will specifically be using autofill to copy formulas.
However, autofill can also be used to create a series / sequence of values, such as quickly creating a list of numbers or sequence of dates. If you want to learn how to use autofill / fill down to create a series of values, then check out the article linked below.
“Automatically Create a Series of Values”
Autofill vs. ARRAYFORMULA
If you are searching for a way to apply a formula to an entire column, you might have been searching for a single formula that can handle that task without having to copy multiple formulas, and this can be done by using the ARRAYFORMULA function in Excel.
But in this article we will stick to using autofill / fill down to copy formulas.
Copying to an entire column vs. a range of cells
In the examples below we will be copying formulas down a range of cells, such as C3:C17, which we will refer to as a “column”… since when it comes to real world spreadsheet applications, where we usually have headers in our sheet, if we are talking about applying formulas to a “column”, we are often referring to a range of cells within that column.
If you actually want a formula in every single cell of a column, it can be as simple as copying your formula, selecting the entire column, and then pasting the formula into the entire column (more on this below).
To describe the examples in this article I will stick to the traditional way of teaching how to autofill formulas, which is to click and drag the fill handle until the desired cell/range has been reached / copied to.
But in your case you may have hundreds or even thousands of rows, and so below I’ll also mention some different shortcuts that you can use to make things faster, especially when you have a large number of columns or rows to be filled / copied to.
Autofill vs. Copying and Pasting Formulas
It’s good to note that using autofill on formulas is effectively the same as copying and pasting cells with formulas in them from one location to another (by using Ctrl + C to copy, and Ctrl + V to paste).
Just like with autofill, copying and pasting a formula will automatically adjust the cell references when moving from one column/row to another.
When you copy a cell that has a formula in it and paste it to a range of multiple cells, it will copy that formula to each cell in the range with an adjusted reference, just like autofill does.
The point is that autofill and copy/paste basically do the same thing.
Spreadsheet Shortcuts
The shortcuts below can help you quickly select cells and copy them to other locations.
If you don’t want to use shortcuts and prefer simply dragging the fill handle, this is perfectly fine.
Cell selection shortcuts
Before I go over the autofill shortcuts, I’ll show you a few ways to quickly select a range of cells that you want to copy formulas into.
An important part of being able to effectively use the autofill shortcuts that are explained in the section below, is being able to quickly select the cells that you want to copy formulas to before using the shortcut.
These selection shortcuts will also be helpful if you are copying and pasting formulas to a range of cells with Ctrl +C and Ctrl + V.
Click and drag
You can select multiple cells by clicking the first cell in your range, then while holding your click, drag the cursor in the direction that you want to expand your range, until you have reached the cell that is at the end of the desired range.
Ctrl + Click
A way of quickly selecting a large range of cells, is to select the first cell in the range that you want to select (top / left cell), and then while holding the “Ctrl” key, click the last cell that is in the range that you want to select (bottom / right cell).
This will instantly select the entire range of cells that begins and ends with the cells that you clicked on.
Shift + arrow keys
To select multiple cells by using the arrow keys, select the first cell in the range that you want to select, then hold the shift key on the keyboard, and then press the arrow key that points in the direction that you want to expand your selected range to.
You can repeatedly press the arrow key(s) to increase the size of the range by a column or row each time the key is pressed, or you can hold down the arrow key(s) to expand the range more quickly.
Shift + Ctrl + arrow keys
This keyboard shortcut will allow you to quickly select a large range of cells, and is particularly useful for using the fill down keyboard shortcut, as it will allow you to start from a designated cell and quickly select all of the cells below it.
When holding both the Shift key and the Ctrl key, pressing an arrow key will expand your cell selection to where the column or row ends.
If there is not data in the cells, the selection will expand to the last cell of the sheet… and if there is data in the cells already, then the selection will expand to the edge of where the data stops (until reaching an empty cell).
In other words this method allows you to quickly select “bricks” of data, or to select entire rows/columns when no data is present.
Selecting entire columns or rows (every single cell)
As mentioned above, you may have situations where you actually want to copy a formula into every single cell of a row or column.
You can select an entire column or row by clicking on the number itself on the left side of a given row, or by clicking on the letter itself at the top of a given column. This will instantly select every single cell in that row or column.
As will be explained below, the fill down shortcut copies the formula/contents that are in the topmost cell of the selected range, and so when selecting an entire column with the intention of using the fill down shortcut to copy formulas, you’d want to make sure that your formula was in the top cell.
In other words, if you had a header row and then used the fill down shortcut while the entire column was selected, it would copy your header into every cell of the column.
To fill every single cell of the column with formulas by using the copy and paste method, simply copy the cell with your formula in it, select the entire column, and then paste.
But as previously mentioned, in the real world we usually have header rows, and we often only want our formulas to extend so far… and so this is why we are using a range of cells to copy to in the examples provided below, such as C3:C12.
The “fill down” and “fill right” autofill shortcuts
Now that you know how to quickly select cells, you can efficiently use the fill down and fill right shortcuts.
Fill down keyboard shortcut: (Ctrl + D)
To use the fill down keyboard shortcut to copy formulas, select the range of cells that you want to copy formulas into, where the top cell of your selection contains the formula to be copied. Then press the keys Ctrl +D. This will copy down the formula that is in the top cell of the selection, through the whole range/column selected.
Fill right keyboard shortcut: (Ctrl + R)
There is also a shortcut for using autofill horizontally. This is called “fill right”, and the shortcut is Ctrl + R.
“Fill right” will copy the formula that is on the far left of the selection, through the whole range/ row selected.
Double click fill down shortcut
Another shortcut that comes in very handy, is a shortcut that allows you to double click the fill handle to fill down automatically.
When you double click the fill handle of a cell, if there is already data in the adjacent columns (to the left or the right), Excel will automatically fill down the formula/contents of that cell until the bottom edge of the adjacent data is reached.
This is helpful when you want to copy down formulas to the same row where the adjacent data set stops vertically.
How to copy a formula down a column in Excel
So let’s finally get started with going over examples.
First we will start simple, by copying / filling a formula that refers to a cell from another column.
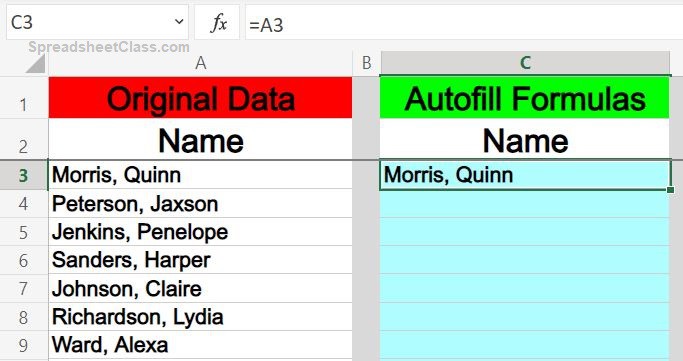
The picture below shows a list of names in column A, and we want to display those same names in column C.
Formula: The formula below is entered initially into cell C3, and then copied into the range C3:C9, for this example
=A3
We want to copy this formula into the cells below cell C3, and to do this follow these steps:
- Select cell C3
- Click and drag the fill handle downwards until reaching cell C9
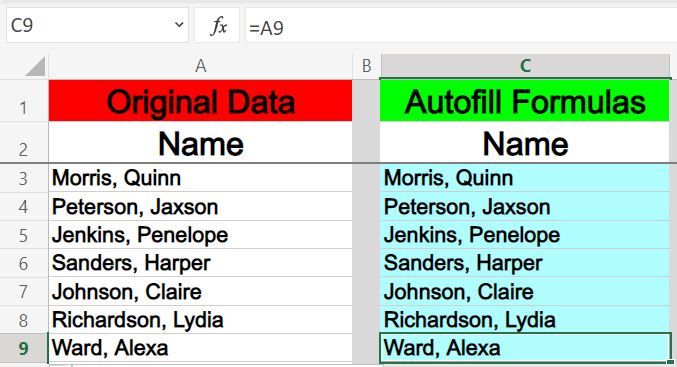
As shown in the picture below, after dragging the fill handle downwards the formula was copied into the range C3:C9, and the list of names in column A can now be viewed in column C.
You can also see that when selecting cell C9, the reference in the formula has adjusted so that the formula in this cell is now =A9.
How to fill a row with formulas in Excel (Fill Right)
Now let’s look at an example that uses autofill horizontally. Here will use “fill right” to fill a row with formulas that refer to cells in another row.
The picture below shows a list of dates in row 1, and we want to display those same dates in row 3.
Formula: The formula below is entered initially into cell B3, and then copied into the range B3:H3, for this example
=B1
We want to copy this formula into the cells to the right of cell B3, and to do this follow these steps:
- Select cell B3
- Click and drag the fill handle right until reaching cell H3

As shown in the picture below, after dragging the fill handle right the formula was copied into the range B3:H3, and the list of dates in row 1 can now be viewed in row 3.

How to fill a column with formulas (Combining First and Last Name)
In this example we will fill a column with formulas that combine first and last name. Combining names is a common task that requires a formula to be copied down a column in Excel.
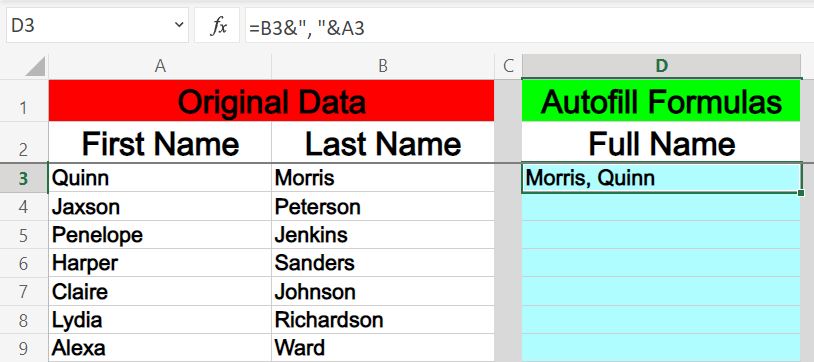
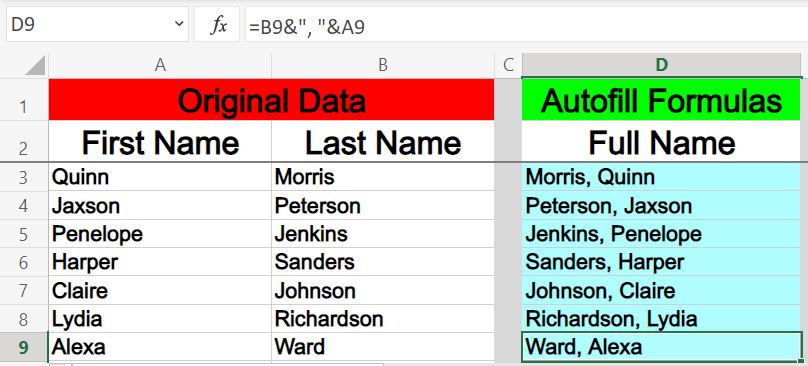
The picture below shows a list of first names in column A, and last names in column B.
We want to combine those names so that they appear in “Last, First” format in column D.
Formula: The formula below is entered initially into cell D3, and then copied into the range D3:D9, for this example
=B3&”, “&A3
We want to copy this formula into the cells below cell D3, and to do this follow these steps:
- Select cell D3
- Click and drag the fill handle downwards until reaching cell D9
As shown in the picture below, after dragging the fill handle down the formula was copied into the range D3:D9, and the list of first/last names that were in columns A and B are now combined in column D.
(For more details on using this formula to combine names/lists, read check out this article on combining columns.)
How to repeat a formula (Addition and Multiplication)
Let’s see an example of using this same fill down method with a different type of formula.
This example shows how to repeat a formula in Excel when you are using addition and multiplication. Adding and multiplying whole columns of data is a common task that requires formulas to be copied down in Excel.
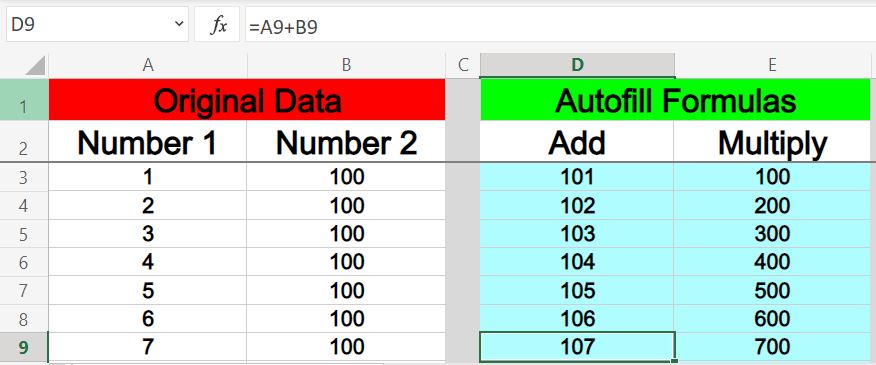
The picture below shows a list of numbers in column A, and a different list of numbers in column B.
The formula(s) in column D will add these two lists of numbers, and the formula(s) in column E will multiply these two lists of numbers.
We will fill/copy both of these formulas at the same time in this example.
Formula: The formulas below are entered initially into cells D3 and E3, and then copied into the ranges D3:D9 and E3:E9, for this example
=A3+B3 is entered into cell D3
=A3*B3 is entered into cell E3
We want to copy these formulas into the cells below where they are entered, and to do this follow these steps:
- Select cells D3 and E3
- Click and drag the fill handle downwards until reaching row 9

As shown in the picture below, after dragging the fill handle down the formulas were copied into the cells below row 3, and the addition and multiplication formulas are now entered into columns D and E respectively.
How to fill down a formula in Excel (IF function)
Here is yet another example that shows how to fill down a formula in Excel, which uses the IF function to demonstrate quickly copying formulas.
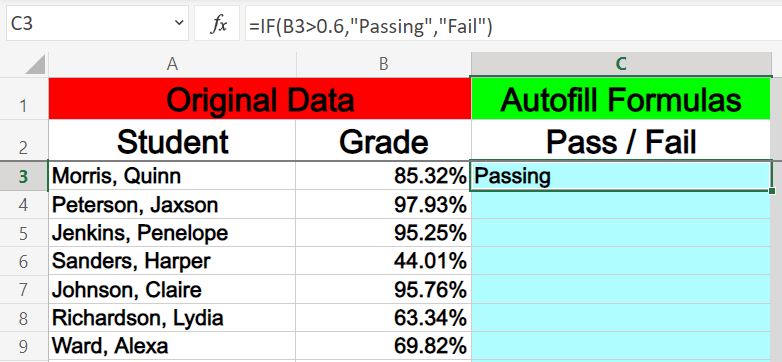
The picture below shows a student grade report, where the student names are in column A and their grades are listed in column B.
The IF formula that is entered into cell C3 (blue cell), will display the word “Passing” if the grade in cell B3 is more than 0.6 (60%)… and if the grade is not more than 0.6 the formula will display the word “Fail”.
Formula: The formula below is entered initially into cell C3, and then copied into the range C3:C9, for this example
=IF(B3>0.6,”Passing”,”Fail”)
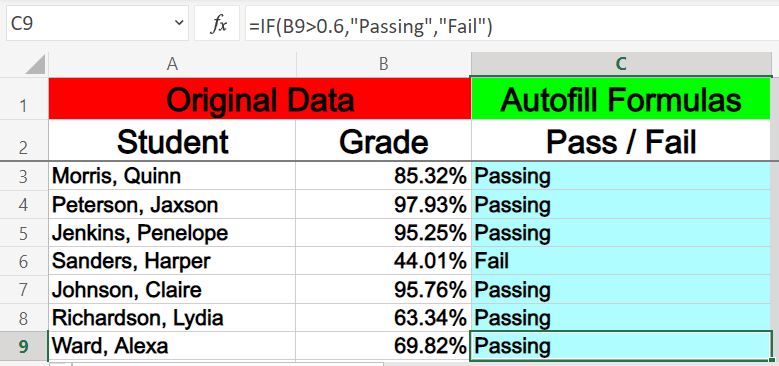
We want to copy this formula into the cells below cell C3, and to do this follow these steps:
- Select cell C3
- Click and drag the fill handle downwards until reaching cell C9
As shown in the picture below, after dragging the fill handle down the formula was copied into the range C3:C9, and the indication of whether a student is passing/failing can now be viewed in column C.
How to autofill a table of formulas in Excel
You can also use autofill to fill an entire table with formulas, where the formulas will be copied in both the horizontal and vertical directions at the same time.
In this example we will fill a table with multiplication formulas to create a “Times Table”.
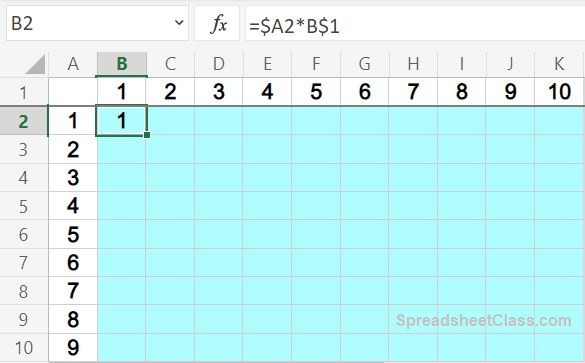
The picture below shows a table with a list of numbers that increments down column A, and across row 1. We want to copy our initial formula that is entered into cell B2 into the whole table of cells, so that each of the formulas multiplies the values that are displayed on the top/left side of each column/row.
We will have to make a special adjustment to the formula references, to make sure that certain parts of the reference do not adjust when the formula is copied.
Notice the dollar signs ($) that I have included in the formula, which lock the column/row indicated directly after it from adjusting when cells/formulas are copied. This is what is called an absolute reference.
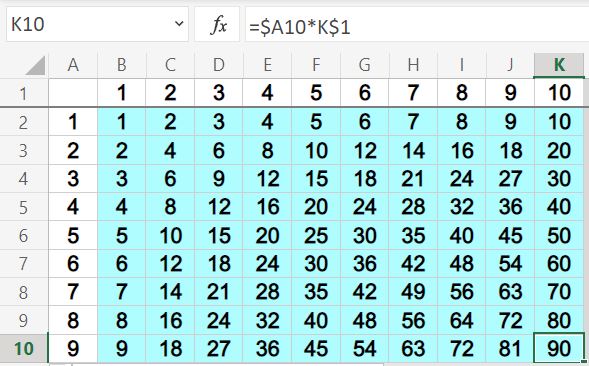
In this case, I have implemented these dollar signs / absolute references so that when the formulas are copied to the right, the formulas will continue referring to the numbers that are listed in column A, but will still adjust horizontally as the numbers in row 1 increment.
Much the same, when the formulas are copied down, the formulas will continue referring to the numbers that are listed in row 1, but will still adjust vertically as the numbers in column A increment.
Formula: The formula below is entered initially into cell B2, and then copied into the range B2:K10, for this example
=$A2*B$1
We want to copy this formula into the cells below and to the right of cell B2, and to do this follow these steps:
- Select cell B2
- Click and drag the fill handle downwards and to the right until reaching cell K10
As shown in the picture below, after dragging the fill handle down and to the right, the formula was copied into the range B2:K10.
Now you know how to quickly and easily copy formulas into columns and other specified ranges in Excel!