

Do you have text that you need to indent in your Google spreadsheet? There are several ways that you can indent in Google Sheets, and in this lesson I am going to show you all of them. I’ll teach you how to automatically add space before the text in a cell, and also how to use columns to indent your sheet or lists etc.
Here are the general instructions, but further below I will go over the varying methods in detail, with examples.
To indent in Google Sheets, follow these steps:
- Select the cell / range of cells that you want to indent
- On the top toolbar, click the “More formats” menu (Button that says “123”)
- Click “Custom number format“
- In the field that says “Custom number format”, type three spaces followed by an @ symbol
- Click “Apply”
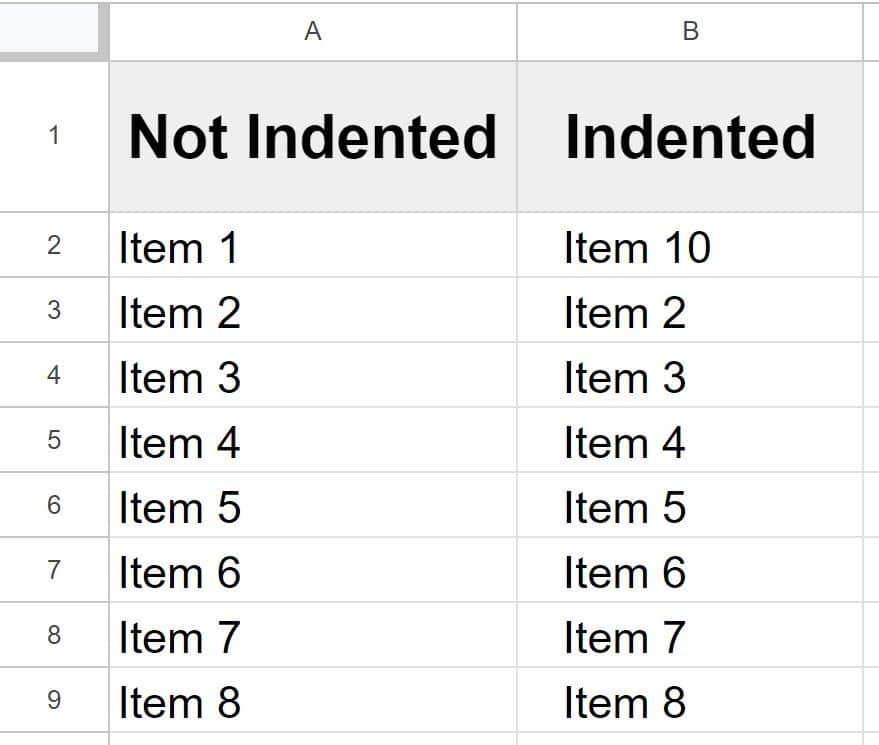
After following the steps above, Google sheets will automatically put three spaces before any text that is entered into the range that you applied the formatting to. In other words Google Sheets will automatically indent the text with the custom number formatting described above. Below you can see the difference between cells that have the indented format applied, and cells that do not.
Click here to get your Google Sheets cheat sheet
See below for detailed examples that show multiple ways to indent in Google Sheets.
Indent manually by typing spaces
If you want, you can indent text manually in Google Sheets by manually typing spaces before entering text. This works well when you are only typing a couple of things that you want to indent quickly.
Press the space key three times (or however many times you want) before typing to indent new text entries. Simply click on a new cell, and tap the space key three times before typing.
You can see in the image below that the text is indented within the cell, and that there are spaces shown in the formula bar (highlighted).
But this method is very basic. See below for methods that make it easier to automatically indent existing text.
Indent automatically with custom number formatting
The best way to indent in Google Sheets, is to use custom number formatting, which will automatically indent your text, for existing data, and when data is entered in the future. This is the method that I prefer if I have multiple cells where I want space to appear before the text in the cells.
Select the cell or range of cells that you want to indent.
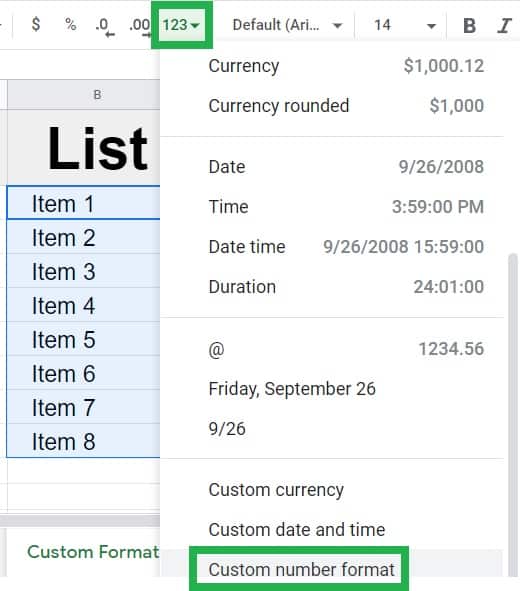
As shown below, on the top toolbar menu, there is a button that says “123”, click this to open the “More formats” menu.
At the bottom of the menu, click “Custom number format”.
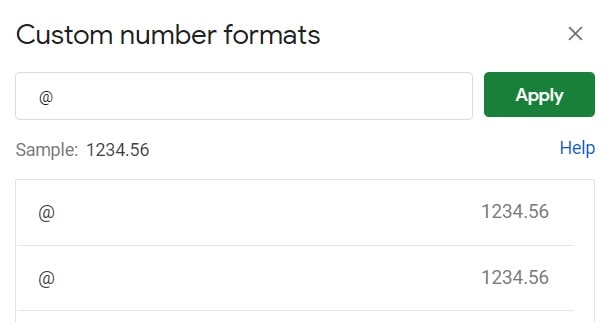
As shown below, the “Custom number formats” menu will pop up. Here you can customize how you want your data to be formatted. In this case we are going to indicate that we want three spaces to appear before our text, or in other words that we want to indent our text by three spaces.
To do this, in the field that says “Custom number format”, type three spaces and then type an @ symbol, as shown in the image below (Notice that the @ symbol is shifted three spaces to the right, because three space characters were typed before the @ symbol.
Then click “Apply”
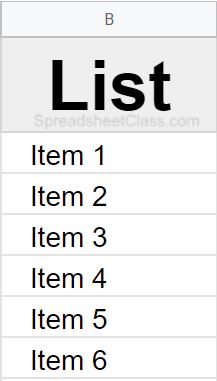
As you can see in the image below, after applying the custom number formatting as described above, the items in the task list have been indented.
This method is great for indenting text that has already been entered into the cells, and will also indent new text that is entered within the range where you changed the formatting.
Another great thing is that if you click on one of the indented cells, you’ll see that in the formula bar the spaces do not appear before the text. Your text entries / values within the cells remain the same as they were at their core, but Google Sheets just changes the visual formatting.
Customize how many spaces to indent
You can choose how much you want your text to be indented by varying the number of spaces that you enter before the @ symbol in the custom number format men, as described in the example above.
You can indent more by entering more spaces before the @ symbol, or you can indent less by entering fewer spaces before the @ symbol.
You can also use multiple levels of indention in your sheet, where some cells are are indented more than others. Further below I will show you another way to indent with multiple levels.
Indent by using a formula
If you want, you can also indent text with a formula in Google Sheets. This method adds spaces before your text by using a formula, which means that in one column you’ll have text that is normal, and in another column you’ll have text that is indented by a formula. You can copy and paste the list generated by the formula in another place, by pressing Ctrl + C to copy, and then pressing Ctrl + Shift + V to paste values only, which will transfer only the values and not the formatting or formulas.
To indent with a formula, we will use the ARRAYFORMULA function with the & operator / ampersand, to tell Google Sheets to add three spaces before the text in a specified column, like this =ARRAYFORMULA(” “&A2:A)
The formula above / below combines a string of three space characters with the contents of column A. Click here to learn more about using the ARRAYFORMULA function.
Example formula: =ARRAYFORMULA(” “&A2:A)
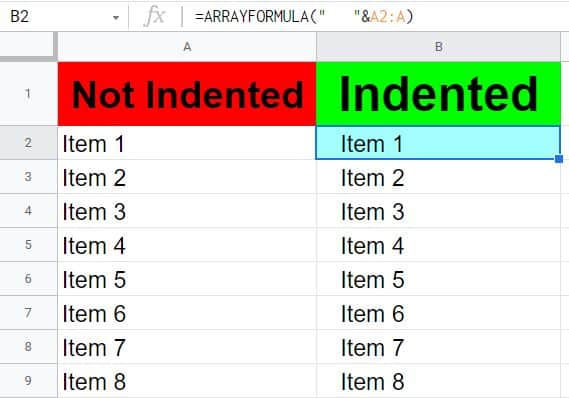
Notice that in the example image above, the text in column A is not indented, but the text in column B is indented by the formula.
Indent by using multiple columns
You can also use additional columns to indent in Google Sheets, where instead of the content of the cells being indented within the cell itself, columns are used to create space / indentations in your sheet.
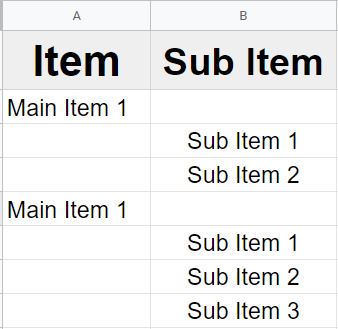
As shown below, you can create multiple level lists by using multiple columns, for example where the main item / task is entered into column A, and where the sub item / task is entered into column B. This effectively indents the text in column B. See below for how to adjust the column width to make it look better.
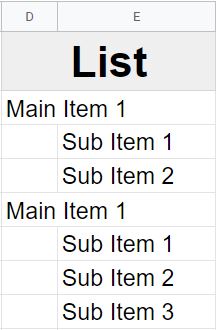
If you narrow the width of the first column in the list, as shown below, it makes the indentation less extreme and it makes the list look much better. As you can see, since column D is narrow, the sub items in column E are indented slightly, which makes the list look nice and organized / compact.
This content was originally created by Corey Bustos / SpreadsheetClass.com
Indent an entire sheet
Do you ever feel like your entire sheet is too far over to the left, and that you need to create a little extra space for the whole sheet? A very common practice is to add a column on the left side of your sheet, to indent the entire sheet. This is demonstrated in the example image below. Column A is blank and the column width was reduced so that the entire sheet is indented.
Quickly indenting specific cells
If you want to be able to quickly indent certain cells without having to apply the custom number formatting each time, you can use “Paint format” to easily applying the indenting format to the cell(s) that you want.
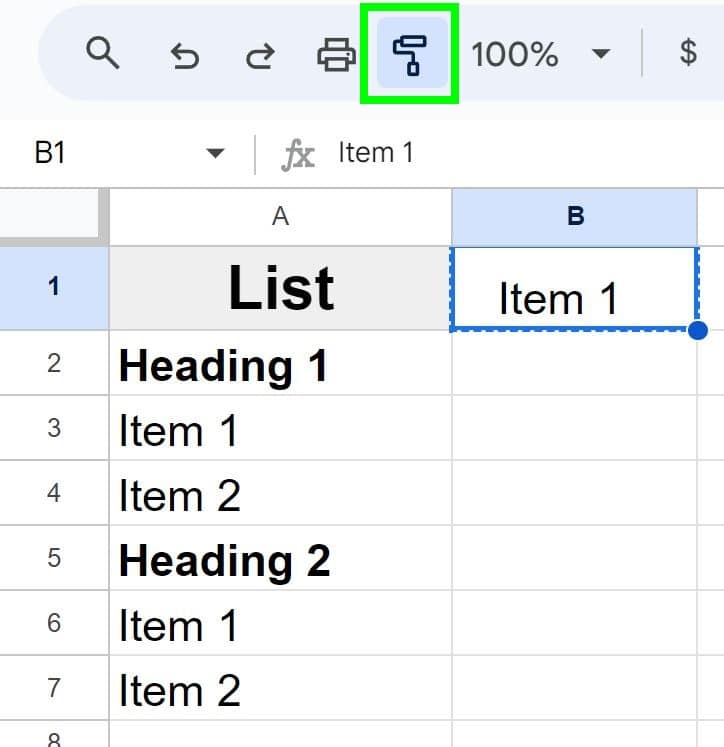
Let’s say that we have a list of headings and items under each heading, where we want to indent the list items but not the headings.
In cell B1 there is a cell with text that already has the custom number formatting applied to automatically indent text.
Click on the cell that is indented, then click the “Paint format” button on the top toolbar (looks like a paint roller).
Then click on the cell that you want to transfer the formatting to.
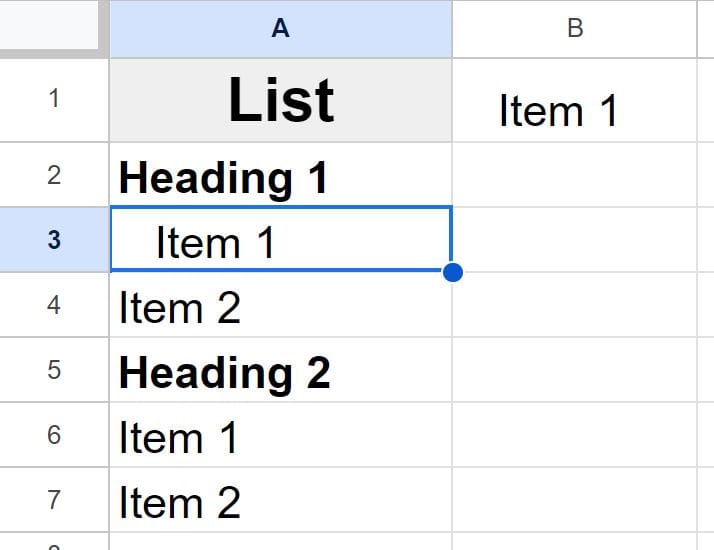
As you can see in the image below, the custom number format that indents the cell has now been applied to the item in the list. Repeat this process with the “Paint format” feature until all of the cells that you want are indented. If you want, you can apply the formatting to multiple cells at once, by selecting a range of cells after clicking the “Paint format” button.
Now you know all of the different ways to indent in Google Sheets!
Pop Quiz: Test your knowledge
Answer the questions below about indenting in Google Sheets, to refine your knowledge! Scroll to the very bottom to find the answers to the quiz.
Question #1
True or False: Using custom number formatting will allow you to automatically indent text / values
- True
- False
Question #2
Which of these functions will indent text?
- =ARRAYFORMULA(A2:A)
- =ARRAYFORMULA(” “&A2:A)
- =ARRAYFORMULA(B2:B&A2:A)
Question #3
True or False: There is a formula named “INDENT” that will indent text
- True
- False
Answers to the questions above:
Question 1: 1
Question 2: 2
Question 3: 2