

By default Google Sheets has 26 columns in a new spreadsheet (A through Z), but you can add more columns anywhere you want in your spreadsheet. Sometimes you may need room for more data, or you may simply want to insert a blank column in an exact location.
In this lesson I will show you how to add a single column or multiple columns to your spreadsheet. I’ll show you how to add the columns to the end of the spreadsheet, or in any location that you want.
To insert columns into a Google spreadsheet, follow these steps:
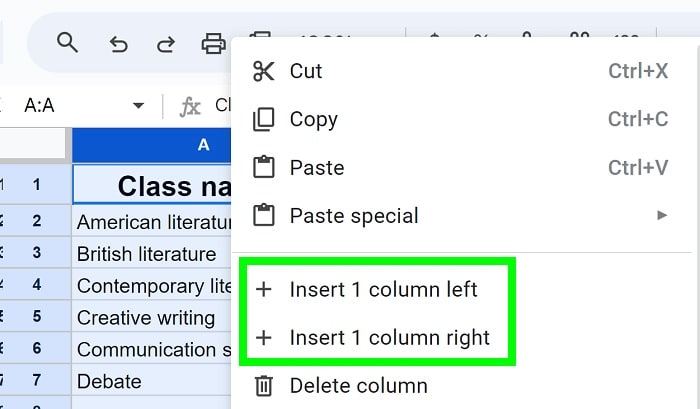
- Select a column where you want to insert another column. Or select multiple columns.
- Right-click on the letter at the top of the selected column or one of the selected columns
- Choose “Insert 1 column left” or “Insert 1 column right”. If multiple columns were selected, multiple columns will be inserted
After following the steps above, you will have successfully added a new column (or multiple new columns) to your Google spreadsheet.
Right-clicking on the selected column(s) is the easiest way to add columns, but if you want you can click “Format” > “Columns” instead.
This lesson focuses on adding columns, but you can click here to learn how to add rows in Google Sheets.
Number of columns selected controls the number of columns inserted
Note that the number of columns that you select before adding columns, controls the number of columns that will be inserted into your spreadsheet. When you select a single column, only one additional column will be inserted into your sheet when you insert columns. If you select 3 columns, 3 columns will be inserted when you insert columns.
How to select one or multiple columns
To select a single column in Google Sheets, click on the letter at the top of the desired column.
To select multiple columns in Google Sheets, click and hold your cursor on the letter of the first column you want to select, then drag your cursor across the headers of the columns you wish to select. Release your cursor once all the desired columns are highlighted.
Width of the selected columns controls the width of the added columns
When you add columns to your Google Sheets document, the width of a newly inserted column will automatically match the width of the selected column / column that was right-clicked. If multiple columns are selected, the width of the new column will match the width of the column that is on the edge of where the new columns are being added (to the left or right).
Adding columns to the end of the sheet (Past Z)
Adding columns to the end of a Google spreadsheet (beyond column Z), is frequently needed to store more data or more features on a single tab.
To add columns to the end of the sheet / past column Z, follow these steps:
- Select column Z to insert a single column. Or select multiple columns up to and including column Z, to insert multiple columns
- Right-click on the letter at the top of the selected column or one of the selected columns
- Choose “Insert 1 column left” or “Insert 1 column right”. If multiple columns were selected, multiple columns will be inserted
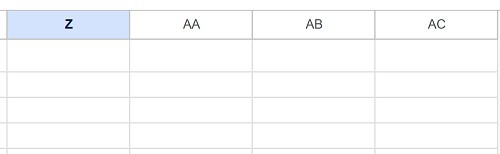
A new column / new columns will appear to the right of the last column, extending your spreadsheet further.
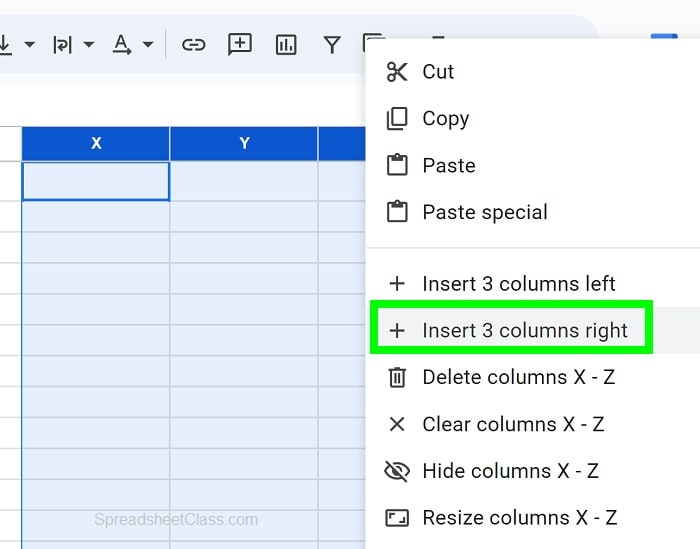
As you can see in the image below, 3 columns were added past column Z (columns AA, AB, and AC).
Adding a single column to the left or right
If you only need to add a single column to your sheet, this can be done very easily. If you want you can first select the column where you want to add another column, or you can simply right-click on the column without needing to select it first.
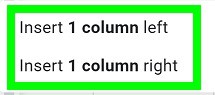
To add a single column (to the left or right) in Google Sheets, follow these steps:
- Right-click on the letter at the top of the selected column
- Choose “Insert 1 column left” or “Insert 1 column right”
A new column will appear in the selected position, adjacent to the chosen side of the existing column.
As you can see in the image above, you can choose to add a column to the left of the selected column, or to add a column to the right of the selected column.
Adding multiple columns
If you want you can add multiple columns to your Google spreadsheet all at once, without having to insert single columns over and over again.
To add multiple columns to a Google spreadsheet, follow these steps:
- Select the columns where you want to insert more columns
- Right-click on the letter at the top of one of the selected columns
- Choose “Insert 2 columns left” or “Insert 2 columns right”. The number of columns inserted will change according the number of columns selected
The specified number of new columns (how many were selected) will appear in the selected position, adjacent to the chosen side of the existing columns.
By following these steps, you can quickly add multiple columns to your spreadsheet as needed.
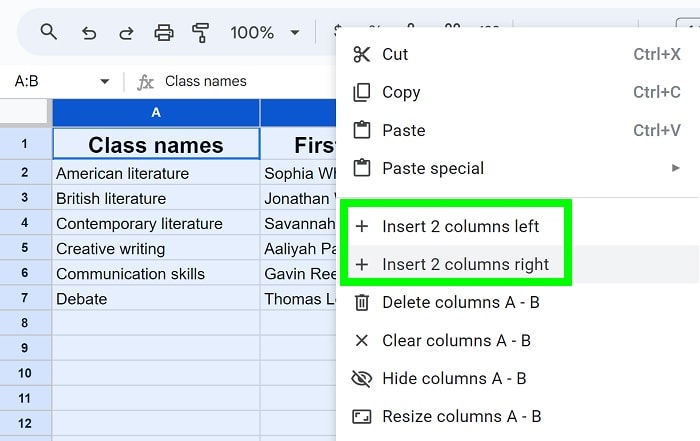
As you can see in the image above, when two columns are selected, Google Sheets will give you the option to add 2 columns at once. The number of columns you select will be reflected in the option to add new columns.
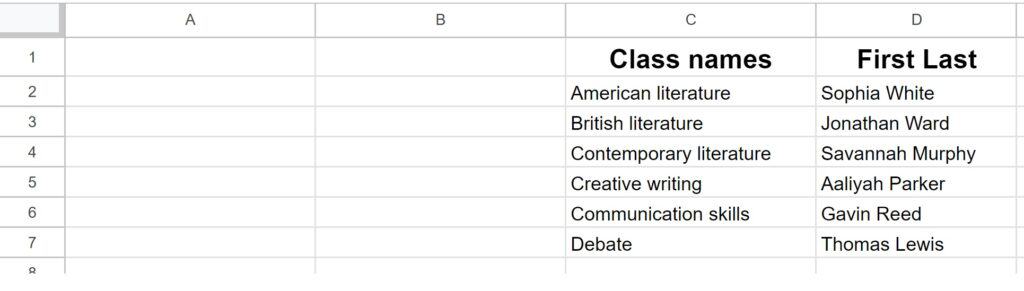
As you can see in the image above, 2 columns have been added to the left of column A (Column A became column C and the two new columns are now A and B).
Adding new columns to specific locations
Sometimes, you may need to insert columns at specific locations within your spreadsheet instead of at the end of the sheet. This can be done by selecting the column(s) at the specific location you want to add columns to.
To add columns to a specific location, follow these steps:
- Select a column where you want to insert another column. Or select multiple columns.
- Right-click on the letter at the top of the selected column or one of the selected columns
- Choose “Insert 1 column left” or “Insert 1 column right”. If multiple columns were selected, multiple columns will be inserted
A single new column will appear in the selected position, shifting the existing columns accordingly to the left or right.
By following these steps, you can precisely place new columns where you need them in your spreadsheet.
For example if you want to insert a column between columns A and B. To do this, either add a column to the right of column A, or add a column to the left of column B.

As you can see in the image above, a new column has been added between columns A and B (Column B became column C).
Now you know how to add columns in Google Sheets!
How to delete columns
To delete columns select the column(s) that you want to delete, right-click on one of the selected columns, then click “Delete column”.