

Do you have a date in your Google spreadsheet that you want to add days to (or subtract) with a formula? There is a very easy way to do this, and in this article I am going to show you multiple ways to add or subtract days, months, or years to/from a date in a spreadsheet. This is something that I have needed to do a lot in the past, especially when creating timelines for student attendance.
In Google Sheets, a date is simply a whole number value, and so when the day increments by 1, the number value also increments by 1. So to add 1 day to a date, you add the number 1 to the initial date. To add 30 days to a date, you add the number 30 to the initial date.
To add days to a date in Google Sheets, use a simple addition formula that adds a number to the initial date, where the number being added represents the number of days to add to the date. For example if you want to add 1 day to a date that is entered into cell A1, use the following formula: =A1 + 1
To subtract days from a date in Google Sheets, use a simple subtraction formula that subtracts a number from the initial date, where the number being subtracted represents the number of days to subtract from the date. For example if you want to subtract 1 day from a date that is entered into cell A1, use the following formula: =A1 – 1
Add days to a date by using numbers
Later I will show you how to add / subtract months and years to a date, but for now let's go over an example of adding and subtracting days. The easiest way is to simply add or subtract numbers to/from the initial date.
To add days to a date in Google Sheets, follow these steps:
- Enter the initial date into an empty cell
- In another cell, enter a formula that adds a number to the initial date, like this:
=A2 + 7(adds 7 days to the initial date / the date entered into cell A2) - Adjust the number of days as needed.
=A2+7
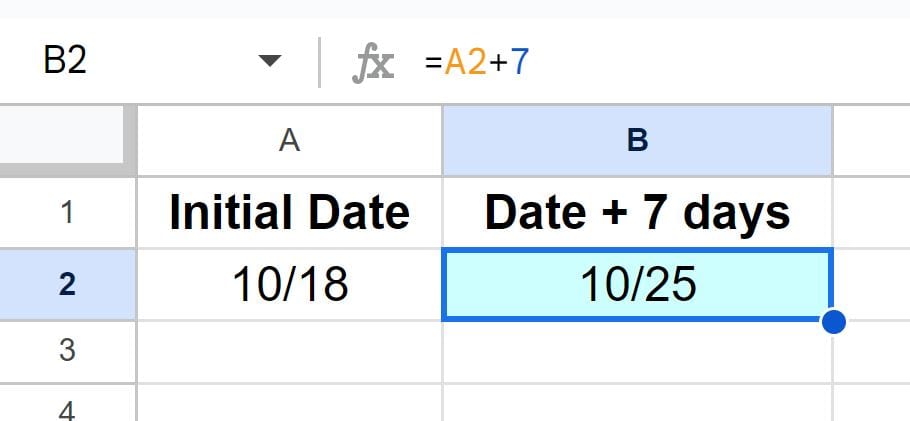
As you can see in the image below, the formula is adding 7 days to the date 10/18, which results in the date 10/25.
Subtracting days from a date
You can use subtraction instead of addition if you want to subtract days from a date to find what the date would have been x many days in the past.
For example:
If you want to find what the date was 7 days ago, use a formula like this:
=A1-7
Using cell references to add/subtract days to/from a date
If you want, instead of entering the number of days that you want to add directly into the formula, you can enter the number of days to add into a spreadsheet cell, and then refer to that cell in your formula to add the numbers of days in the cell to the specified date.
Using cell references allows you to easily update the starting date and the number of days to add without modifying the formula each time.
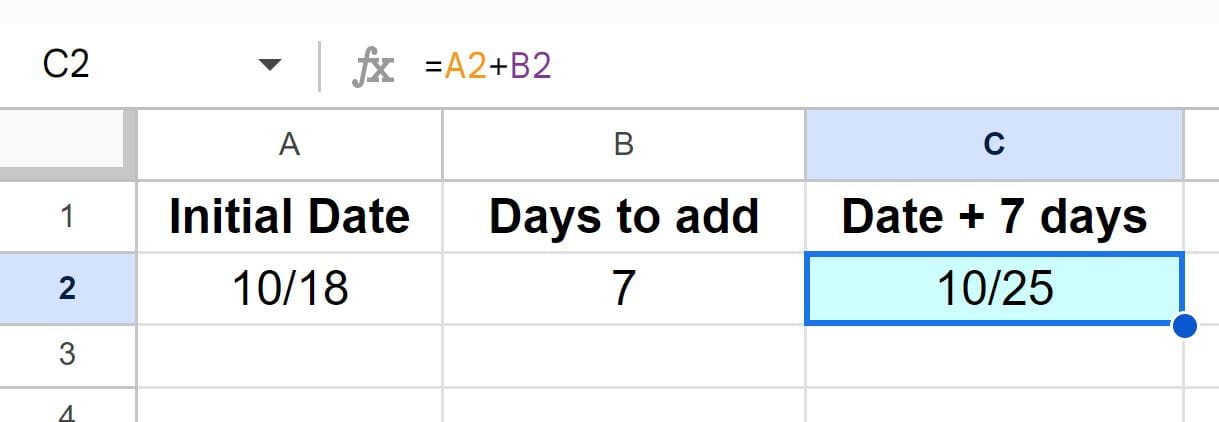
For example, if you enter the initial date in cell A2, and the number of days to add to that date in cell B2, then you can use the formula =A2+B2 to add the days to the initial date.
To add days to a date by using cell references, follow these steps:
- Enter the initial date into an empty cell such as cell A2
- In another cell such as cell B2, enter the numbers of days to be added
- In another cell such as C2, enter a formula that adds both cells together, like this:
=A2 +B2 - Adjust the number of days as needed.
Let's say your initial date is in cell A2, and the number of days to add (7) is in cell B2. You would input =A2 + B2 in your destination cell. If A2 contains the date "10/18/2023," the formula will display "10/25/2023" in the destination cell (as shown in the image below).
=A2+B2
If you want to subtract days from a date by using cell references, your formula will look like this:
=A2-B2
Add months to a date
Adding months to a date in Google Sheets is slightly different, as months can have varying numbers of days. To find the date after x many months, you can use the EDATE function.
To add months to a date, follow these steps:
- Enter a start date in an empty cell, such as cell A2
- Type =EDATE( to begin the function
- The refer to the cell that the start date is in, like this =EDATE(A2
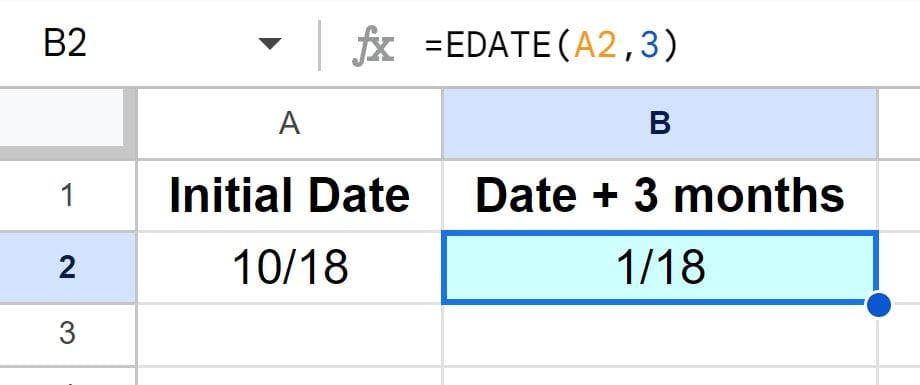
- Type a comma, and enter the number of months to add (any number you want), like this =EDATE(A2,3
- Press enter on the keyboard. The final formula will look like this: =EDATE(A2,3)
The destination cell will display the updated date, which is the initial date with the specified number of months added.
Suppose your initial date is in cell A2 with the value "10/18/2023," and you want to add 3 months. Using the formula =EDATE(A2, 3) the destination cell will display "1/18/2024" as shown in the image below.
=EDATE(A2,3)
Subtract months from a date
You can use subtraction instead of addition if you want to subtract months from a date to find what the date would have been x many months in the past.
For example:
If you want to find what the date was 3 months ago, use a formula like this:
=EDATE(A2,-3)
Click here to get your Google Sheets cheat sheet
Add years, months, or days to a date with the DATE function
To add years to a date, we need to use a different method. Luckily this method will work for adding days, months, and years to a date in Google Sheets. First we will go over the DATE function, then I'll show you how to combine the DATE function with the DAY, MONTH, and YEAR functions, which will allow us to add or subtract any number of days / months / years from a date.
These functions allow us to take a date and gain control over each individual portion of the date (Month / Day / Year) with formulas.
The DATE function
So first, let's briefly go over a basic example of the DATE function so that you can easily understand the next examples.
The date function simply allows us to specify a date by specifying a year, a month, and a day. In this example we are entering the numbers directly into the formula. We want to represent the date 10/18/2023, so first the formula will ask us to specify the year, then the month, and then the day, as shown in the formula / example below.
Syntax: DATE(year, month, day)
=DATE(23,10,18)

As you can see in the image above, the DATE function is now displaying the date 10/18/2023.
DAY, MONTH, YEAR functions
Now let's use cell references to do some cool things with the DATE function. If you wanted, you could enter the year, month, and day into separate cells, and then refer to those individual cells with the DATE function, like this: =DATE(A2, B2, C2) (Where the year is in cell A2, the month is in cell B2, and the day is in cell C2.
But in this example, we are taking a date that is entered into a cell, and referring to it with the DATE function (along with the YEAR, MONTH, and DAY functions), to gain control over each individual portion of the date.
We will use the YEAR function to retrieve the year from the date 10/18/2023. This gives us the year: 2023
We will use the MONTH function to retrieve the month from the date 10/18/2023. This gives us the month: 10
We will use the DAY function to retrieve the day from the date 10/18/2023. This gives us the day: 18
The YEAR function is used for the "Year" criteria in the DATE function. The MONTH function is used for the "Month" criteria in the DATE function. The DAY function is used for the "Day" criteria in the DATE function, as shown in the formula / example image below.
=DATE(YEAR(A2),MONTH(A2),DAY(A2))
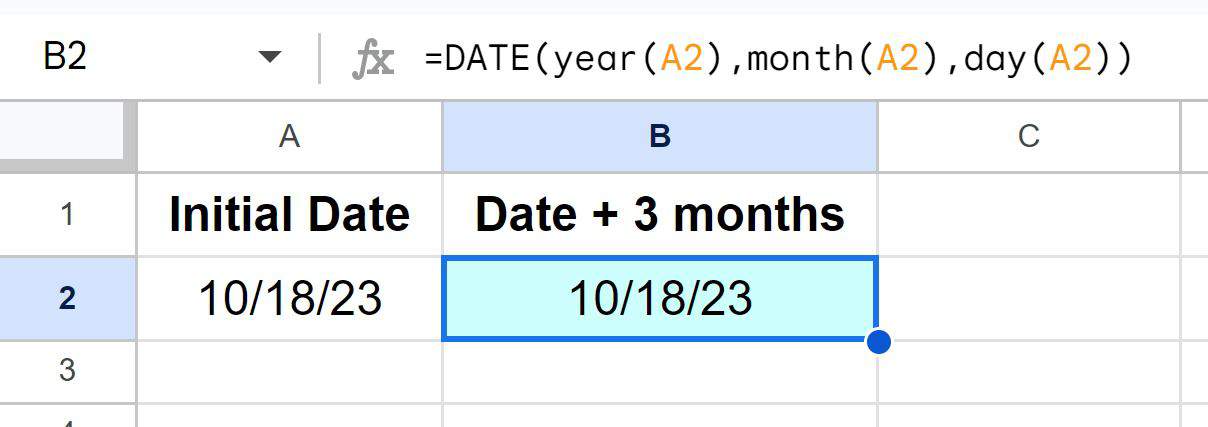
As you can see in the image above, the date 10/18/2923 is entered into cell A2, and the DATE formula is representing the same date in cell B2. Now that the formula is set up like this, we can control each individual portion (Year, Month, Day), such as being able to add days, months, or years to the date.
Add years to a date in Google Sheets
The formula below adds 1 year to the date entered into cell A2, by adding the number "1" to the "Year" criteria, like this: YEAR(A2)+1.
To add years to a date in Google Sheets, simply replace the number "1" in the following formula with the desired number of years that you want to add:
=DATE(YEAR(A2)+1,MONTH(A2),DAY(A2))

As you can see in the image above, the formula in cell B2 is displaying the date 10/18/24, which is 1 year past the date entered into cell A2 (10/18/2023).
In this example we needed to make sure that the date format was displaying the year, so that we can assure that the formula is doing what we expect.
Subtract years from a date with the DATE function
You can use subtraction instead of addition if you want to subtract years from a date to find what the date would have been x many years in the past.
For example:
If you want to find what the date was 1 year ago, use a formula like this:
=DATE(YEAR(A2)-1,MONTH(A2),DAY(A2))
Add months to a date with the DATE function
The formula below adds 1 month to the date entered into cell A2, by adding the number "1" to the "Month" criteria, like this: MONTH(A2)+1.
To add months to a date in Google Sheets, simply replace the number "1" in the following formula with the desired number of months that you want to add:
=DATE(YEAR(A2),MONTH(A2)+1,DAY(A2))
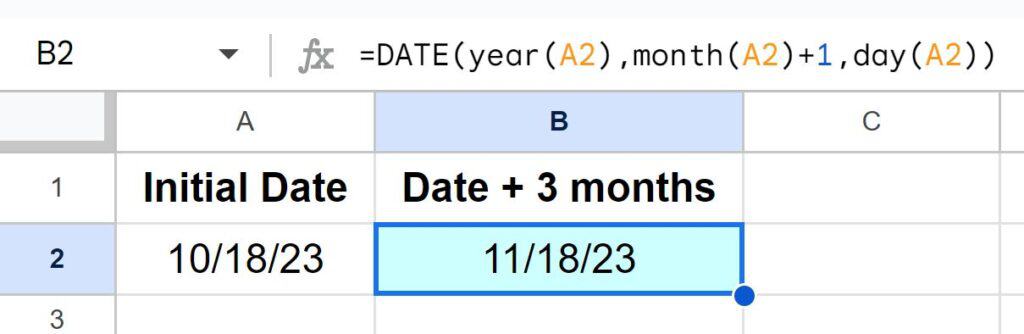
As you can see in the image above, the formula in cell B2 is displaying the date 11/18/23, which is 1 month past the date entered into cell A2 (10/18/2023).
Subtract years from a date with the DATE function
You can use subtraction instead of addition if you want to subtract months from a date to find what the date would have been x many months in the past.
For example:
If you want to find what the date was 1 month ago with the DATE function, use a formula like this:
=DATE(YEAR(A2),MONTH(A2)-1,DAY(A2))
Add days to a date with the DATE function
The formula below adds 1 day to the date entered into cell A2, by adding the number "1" to the "Day" criteria, like this: DAY(A2)+1.
To add days to a date in Google Sheets, simply replace the number "1" in the following formula with the desired number of days that you want to add:
=DATE(YEAR(A2),MONTH(A2),DAY(A2)+1)
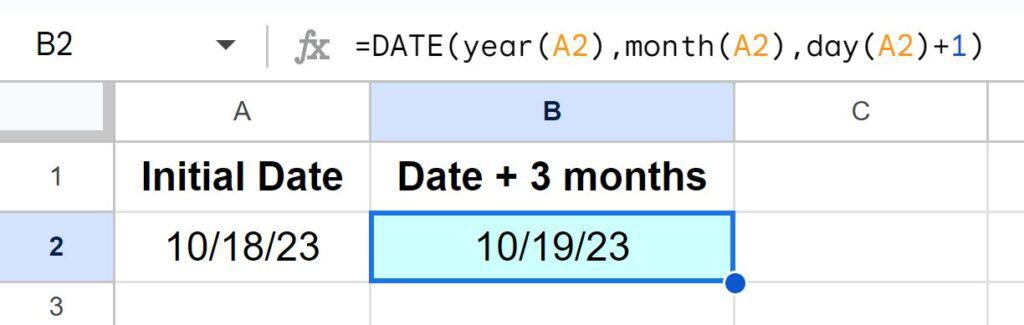
As you can see in the image above, the formula in cell B2 is displaying the date 10/19/23, which is 1 day past the date entered into cell A2 (10/18/2023).
Subtract years from a date with the DATE function
You can use subtraction instead of addition if you want to subtract days from a date, to find what the date would have been x many days in the past.
For example:
If you want to find what the date was 1 day ago with the DATE function, use a formula like this:
=DATE(YEAR(A2),MONTH(A2),DAY(A2)-1)
Although the first method (simply adding numbers to a date) is the easiest way to add days to a date in Google Sheets, you may find the need to add more than just days to a date, such as if you need to find the date after 3 months and 3 days have passed. Using the DATE function as described above gives you fill control over days, months, and years within a date, in a single formula.
Now you know multiple ways to add days, months, and years to a date in Google Sheets. You also know how to subtract days, months, and years from a date!