There are certain situations when using Google Sheets, when you will want to change the direction of the text that is in the spreadsheet cells, such as when you want to make text vertical. There are several ways to rotate text in a Google spreadsheet, and so you can select the exact text direction/angle that works best for your purpose.
To rotate text in Google Sheets, follow these steps:
- Select the cell or cells that have the text which you want to rotate
- Open the text rotation by clicking “Format” → “Rotation”, or you can click the “Text rotation” dropdown directly on the toolbar
- Select the angle that you want your text to be rotated
Directly below are more detailed steps on rotating text, and then we will go over more examples.
How to rotate text in Google Sheets:
Begin by selecting a cell or multiple cells in your sheet, that contains the text which you would like to rotate.
In this example, we will select cell A1.

After selecting the cells with the text to be rotated, open the text rotation menu by doing one of the following:
Rotate text by using the dropdown on the toolbar
- Option 1- Click the menu on the toolbar that has a slanted letter “A”, as shown in the image directly below

Rotate text by using the “Format” menu
- Option 2- Click the “Format” menu in the toolbar, and then click “Text rotation”, as shown in the image directly below
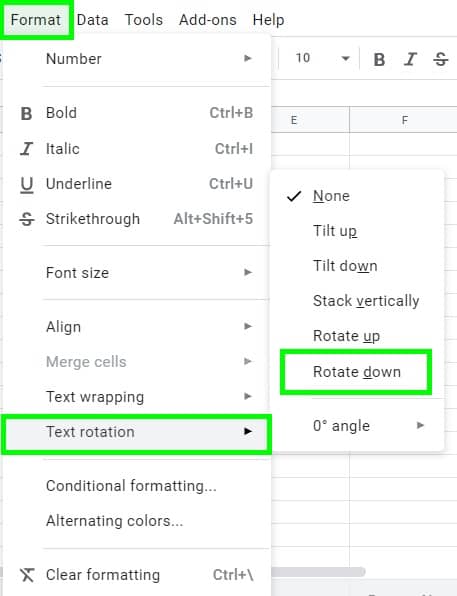
Now simply select the direction that you would like your text to be rotated in. If you want, you can even choose to set a custom rotation angle.
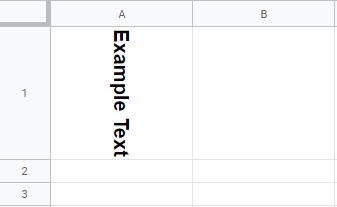
For this example, “Rotate down” has been selected, and you can see how this affected our example text, in the image below.
Notice that the words “Example Text” have now been rotated down, and that the row height has automatically adjusted to fit the text.
In this lesson I will show you several examples of rotating the text inside of cells, and what the text looks like both before and after having been rotated.
In just a moment I will show you the different ways that text can be rotated, but for the examples below we will stick to rotating the text upwards and downwards, as these are the two most commonly used rotation options.
At the end of the article, you will see a section that shows how to rotate text with formulas. Although you can make text vertical with a formula, it’s easiest to simply change the formatting of the cell so that Google Sheets easily handles the rotation for you.
Click here to get your free Google Sheets cheat sheet
The varying ways to rotate text
If you use the text rotation menu that is available directly in the toolbar, you will be able to see an example of what each option will look like.
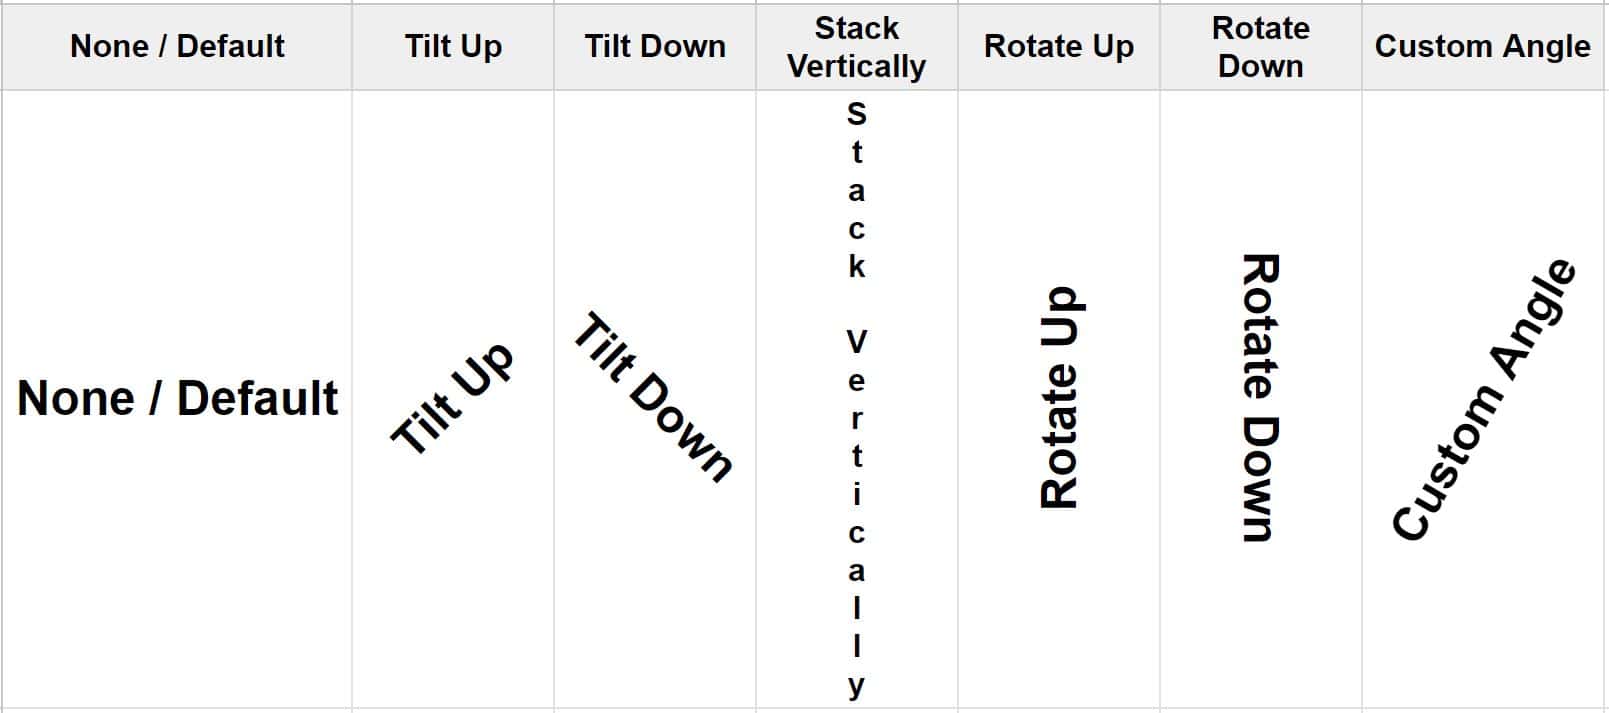
But the image below shows an even better visual that will help you see how each option will transform your text. You can even choose a custom angle to rotate your text by! Later in this lesson I’ll show you how to make text diagonal, and also how to make the borders of the cells diagonal.
You can rotate your text in Google Sheet, in the following ways:
- None (Default)
- Tilt Up
- Tilt Down
- Stack Vertically
- Rotate Up
- Rotate Down
- Custom angle
How to make text vertical in Google Sheets
Okay so let’s go over some examples that contain more data in the spreadsheet.
In the examples below I will show you how to make text vertical in Google Sheets, by rotating text up, and down.
To make text vertical in Google Sheets, follow these steps:
- Select the cell(s) that contain the text that you want to make vertical
- On the top toolbar, click “Format” → “Rotation”, or click the “Text rotation” menu (button with an arrow under the letter “A”)
- Choose the vertical rotation style / angle that you want (Rotate up, Rotate down, or Stack vertically)
How to rotate text up in Google Sheets
One of the most common uses for text rotation in Google Sheets is when you want your columns to be tightly spaced, and your headers are too big to view when the columns are narrow.
In this example we have a set of data that shows the total sales amount per month, for a number of sales reps.
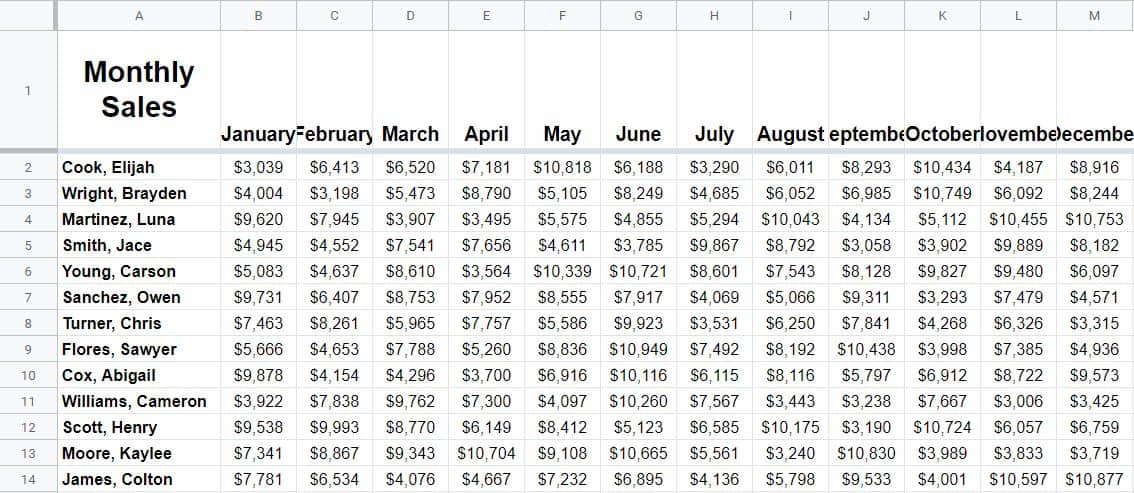
As you can see in the first image, when the columns are narrowly spaced so that the entire year’s sales can be viewed, the names of the months in the header are too long to properly fit within the cells.
For this we will rotate the text up, so that the full name of each month will fit into the columns as they are currently spaced. The row height will automatically adjust to fit the height of the text after being rotated… but in this example you can see that row 1 has already been expanded manually so that the text in cell A1 will fit nicely.
We will not rotate the text in the entire row, because we want to leave the text in cell A1 as it is.
Perform these steps to follow the example below, and to rotate the text up, as shown in the images:
- Select the range of cells B1:M1
- Open the text rotation menu
- Select “Rotate up”
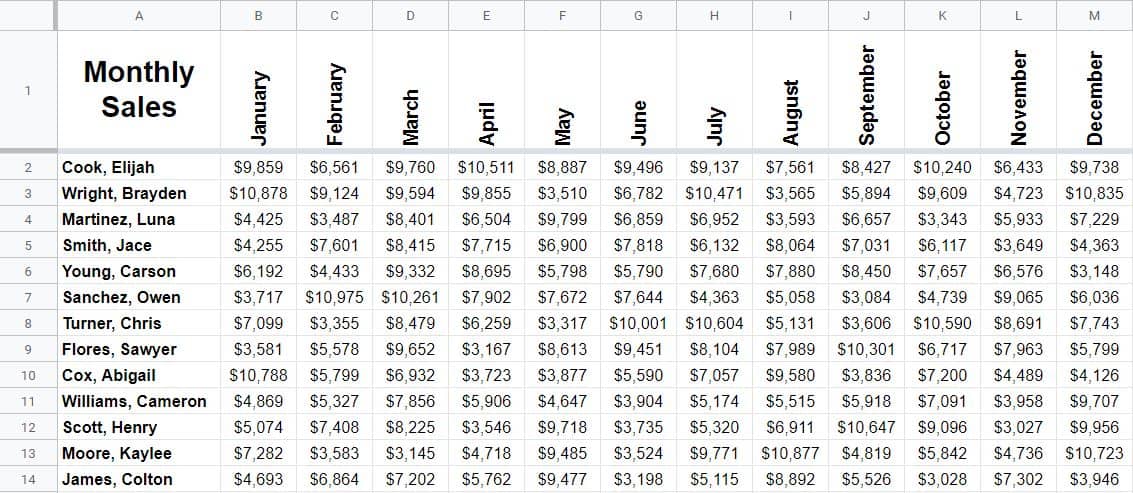
The image below shows what the text looks like after being rotated. The name of each month can be seen in full now, along with all of the sales data.
You will notice in your sheet that the height of row 1 will adjust automatically to fit the longest/tallest piece of text in that row, which in this case, is “September”.
Now let’s take a look at another similar example where the headers must be made vertical to fit a narrow column width.
How to rotate text down in Google Sheets
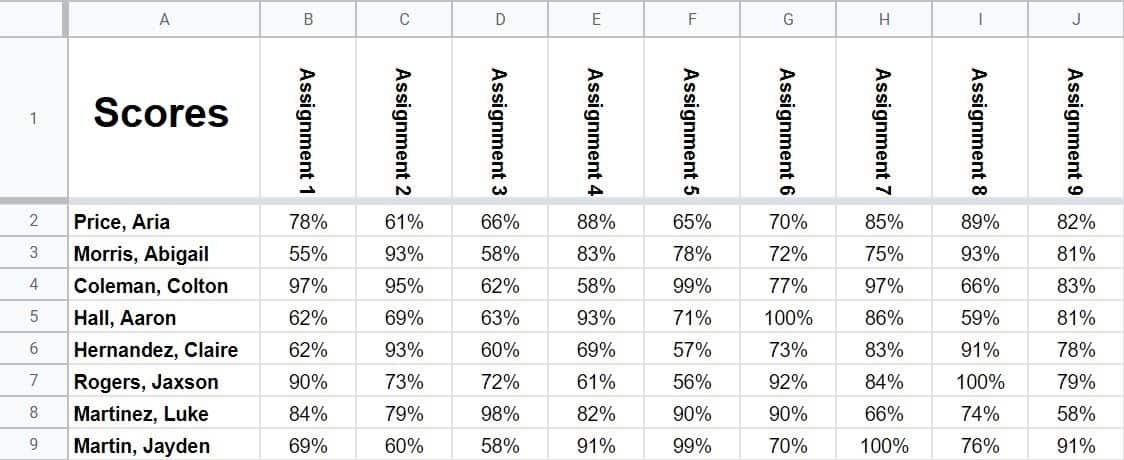
It is very common to use rotated text in grade books, where assignments are listed horizontally across the top of the sheet.
Scores take up very little horizontal room, and so the columns can be pressed tightly together if the assignment names are rotated vertically, so that they fit within the narrow columns.
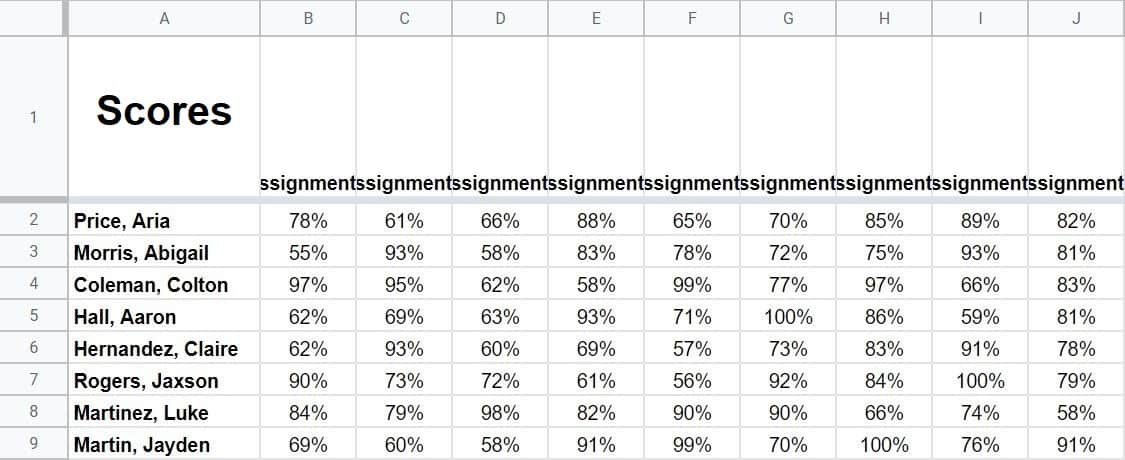
In this example you can see that the assignment names are already entered into row 1, but because of the long words and narrow columns, the text does not fit.
Not only does this look bad, but the assignment numbers can’t be seen, so there is no way of determining which assignment is recorded in each column.
Perform the following steps to follow along with the example, and rotate the text down, as is shown in the images:
- Select the cells in the range B1:J1
- Open the text rotation menu
- Select “Rotate down”
In the image below, you can see that after rotating the assignment names down, they easily fit within the cells, so that both the scores and the assignment names can be viewed.
In this article’s examples we have went over how to make text vertical, but you may sometimes want to orient text so that it is diagonal. So remember that you can choose any direction or angle that suits your needs.
How to stack text vertically
Another way to make text vertical in Google Sheets, is by using the “Stack vertically” option in the text rotation menu. With this option, the letters are kept vertical while the words are rotated to be vertical… which means that the letters are stacked vertically on top of each other. As you can see in the image below in cells B1 through E1, the text in the cells is stacked vertically. This works very well for month abbreviations.

How to make text vertical with formulas
So far we have went over how to rotate text with cell formatting, but there are also a couple of formulas that can make text vertical in Google Sheets, in case you find a use for them.
Both of the formulas that are shown below, can have the text entered directly into the formula, or can use a cell reference to designate the text to be rotated. I have shown both methods, for both formulas.
Vertical Text Formula 1
The first formula that can be used to rotate text in Google Sheets, uses the REGEXREPLACE formula. To see how to extract text and numbers from text strings with REGEXREPLACE, check out the article below.
“All the ways to extract text and numbers from a string”
Formula 1: Text entered in formula itself
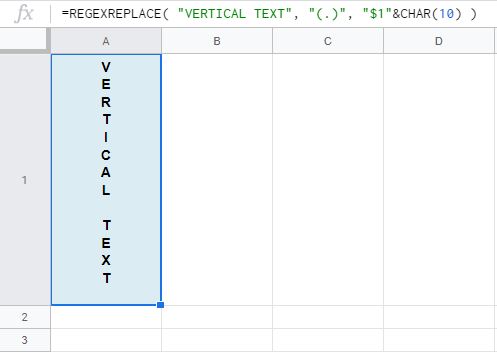
With this formula, the text to be made vertical is entered directly into the formula itself.
=REGEXREPLACE( “VERTICAL TEXT”, “(.)”, “$1″&CHAR
(10) )
Formula 1: Text entered into cell
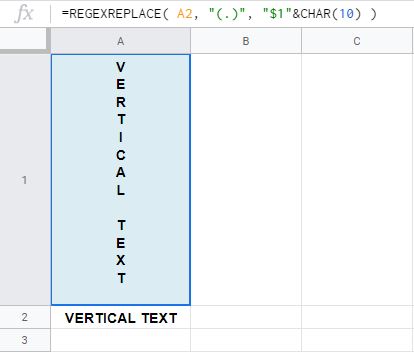
Here is another way of using the same formula, where the text that is to be made vertical, is entered into cell A2, and where the formula refers to that cell to make the text vertical.
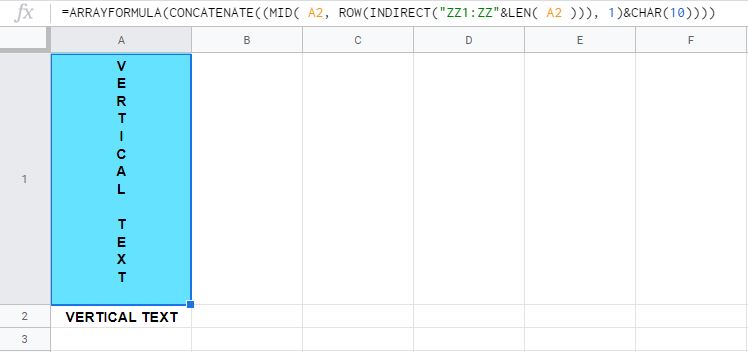
The text to rotate is entered into cell A2, and the formula in cell A1 refers to cell A2. So, the text from cell A2 appears vertically, in cell A1.
=REGEXREPLACE( A2, “(.)”, “$1″&CHAR
(10) )
Vertical Text Formula 2
Now let’s take a look at another formula that makes text vertical in Google Sheets. This one does the same thing as the last formula.
Formula 2: Text entered in formula itself
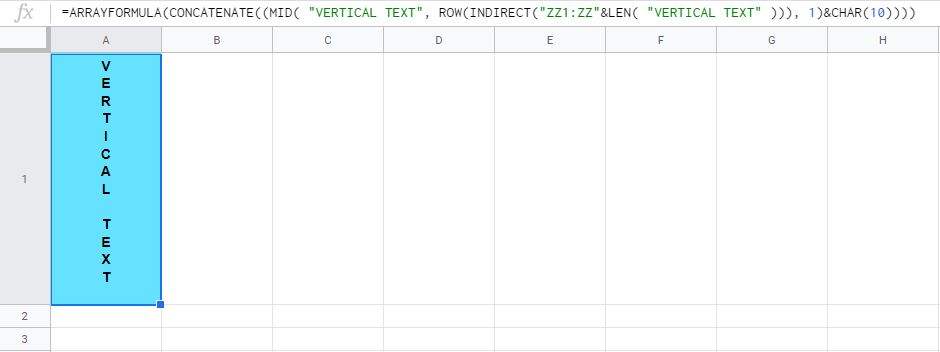
The formula below is the version that has the text to be rotated, entered directly into the formula.
=ARRAYFORMULA(CONCATENATE((MID( “VERTICAL TEXT”, ROW(INDIRECT(“ZZ1:ZZ”&LEN( “VERTICAL TEXT” ))), 1)&CHAR
(10))))
Formula 2: Text entered into cell
This is the version of the formula that refers to a cell to designate the text to rotate.
=ARRAYFORMULA(CONCATENATE((MID( A2, ROW(INDIRECT(“ZZ1:ZZ”&LEN( A2 ))), 1)&CHAR
(10))))
How to make text diagonal in Google Sheets
If you want, in Google Sheets you can also rotate text so that it is diagonal. There are multiple ways to do this.
To make text diagonal in Google Sheets, follow these steps:
- Select the cell or range of cells that you want to rotate / make diagonal
- Choose “Tilt up” to rotate the text diagonally upwards. Or, choose “Tilt down” to rotate the text diagonally downwards. Or, choose “Custom angle” to rotate to an angle of your preference
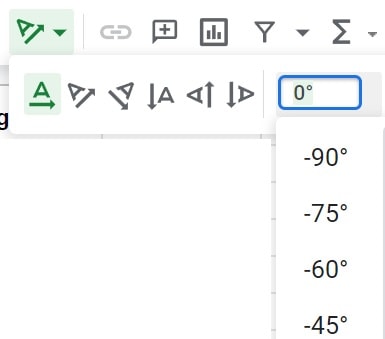
The image below is an example of the text rotation menu, with the “Custom angle” menu opened, and as you can see the menu allows you to select a custom angle for text rotation. 0 degrees is the default. -90 degrees will rotate the text down, and+90 degrees will rotate the text up. But you can choose any angle between those two settings, in increments of 15 degrees.
Tilt up / Tilt Down
To make text diagonal from one of the preset text rotation menu options, either select “Tilt up”, or “Tilt Down”. (See the image at the top of the page for a visual reference)
Tilting the text up means that first letters in the text will be on the bottom left, and the last letters in the text will be on the top right.
Tilting the text down means that first letters in the text will be on the upper left, and the last letters in the text will be on the lower right.
Custom angle text rotation (Diagonal text / headers)
Here is an example of making text diagonal in Google Sheets, with a custom angle. We will use the same student test score data as a previous example to demonstrate.
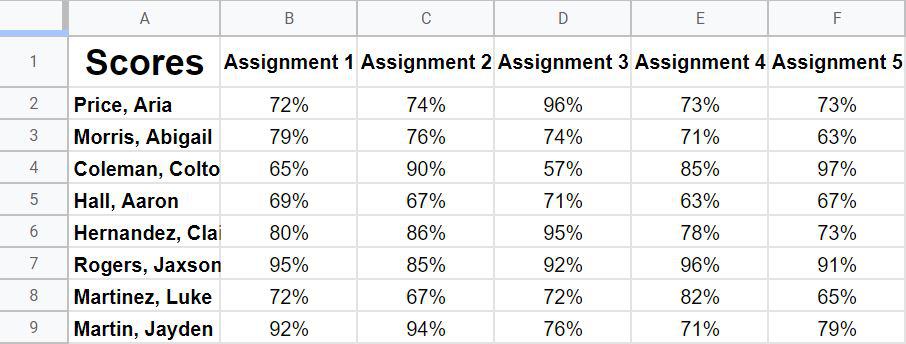
As you can see in the image below, the assignment names for the assignments are listed across the top in the default horizontal rotation / position. We want to rotate the headers / assignment names diagonally so that they take up less horizontal space, but so that they are still easy to read.
See further below for how to do this.
To make the text diagonal in this example, select cells B1 through F1 (B1:F1), click the “Text rotation” menu on the top toolbar, click “Custom angle“, and then choose the angle that you want to rotate the text (For this example we will choose 60 degrees.
As you can see in the image below, after rotating the text / headers 60 degrees, the assignment names are tilted diagonally upwards (at a custom angle). The text takes up less horizontal space, but the diagonal text makes it easy to read the rotated text.
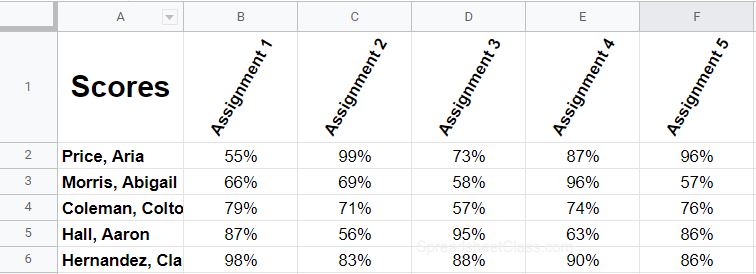
Below is an example of what it looks like to use a negative custom angle, such as -60 degrees. As you can see in the image below, when a negative custom angle is used, the text rotates downwards (at a custom angle).

Diagonal borders in Google Sheets
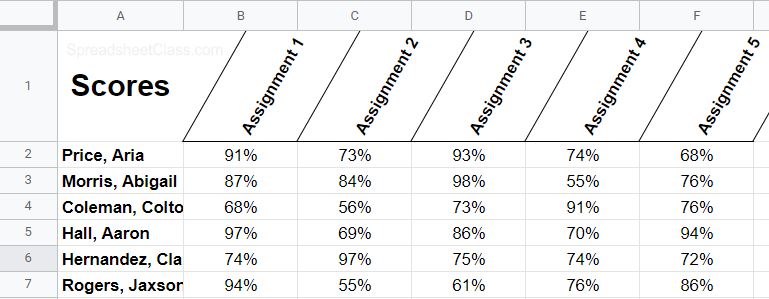
Did you know that you can make diagonal borders in Google Sheets to go along with your diagonal / rotated text? We will continue with the data from the previous example, after the text was rotated diagonally.
To make diagonal borders in Google Sheets, follow these steps:
- In the cell where you want the diagonal borders, rotate the text diagonally (From the text rotation menu)
- Apply inner and outer borders to the cells that have diagonal text. The borders that were applied will tilt diagonally at the same angle as the text
In the image below you can see that after borders were applied to the cells that contain diagonal text, the borders tilted diagonally to match the angle of the text.
Now you know all of the different ways to rotate text in Google Sheets!
Pop Quiz: Test your knowledge
Answer the questions below about rotating text in Google Sheets, to refine your knowledge! Scroll to the very bottom to find the answers to the quiz.
Question #1
Which of the following custom text rotation angles will rotate text downwards?
- 90
- -90
- 0
Question #2
Which of these options will make the text diagonal?
- Rotate up
- Rotate down
- Tilt up
Question #3
True or false: The text rotation options can be found in the “Format” menu, and in a dropdown directly on the top toolbar
- True
- False
Question #4
True or false: With the “Stack vertically” option, the words are rotated but the letters remain vertical
- True
- False
Answers to the questions above:
Question 1: 2
Question 2: 3
Question 3: 1
Question 4: 1
